#Loading Metadata from a File
Explore tagged Tumblr posts
Visit Tumblr Blog
Explore Tumblr blogs with no restrictions, modern design and the best experience.
Last Seen Tumblr Blogs


Fun Fact
Tumblr Inc. is using 66 technologies for its website.
Text
my new downloads folder is sooooo sexy btw. you wish you were me
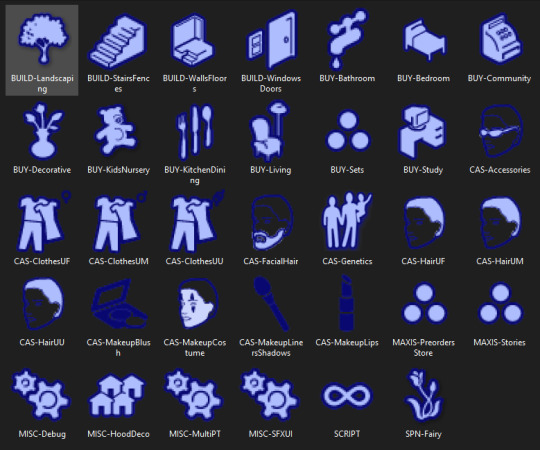
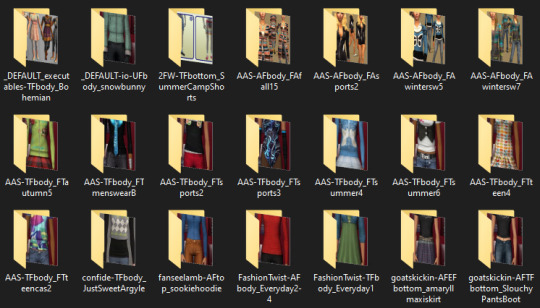
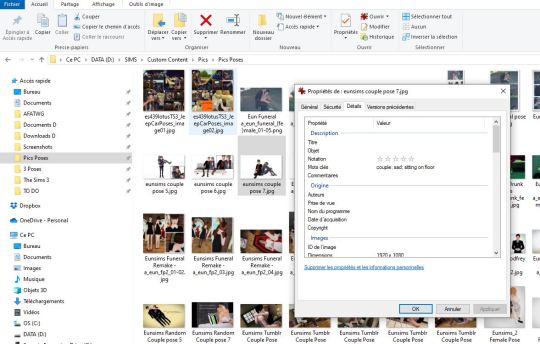
#bulk renamed to remove all special characters. compressorized. all recolors i don't strictly need DELETED. tooltipped. merged.#jpegs compressed to shit because i dont need them to be high res to be able to tell what its previewing.#going back and adding source links to the metadata of some of the images so i remember where i got it from.#everything is at most two subfolders deep. trying to find a good balance between well-organized and shaving off load time.#.txt#simsposting#'miles why are you doing this instead of playing the game' i love sorting my touys!!!!!!!!!!!#also learning that naming a file folder.jpg automatically makes it the cover for a folder changed my LIFE im doing that shit for everything
7 notes
·
View notes
Text
how to post songs as mp3 files and avoid copyright
a bunch of people were asking how to post music on tumblr so here's some kind of tutorial n_n there's probably a thousand better ways to do it out there but this is what i do and it works for me
Step 1: Acquiring music
Before you post any music you gotta have it as an mp3 file. Bunch of people mentioned mp3 converters but my favorite way has always been to just download discographies from blogs. You google "(band) complete discography free download" or something like that and something's bound to show up. If you've doing this for a while you'll skip this first part and go straight to the places you know will have it- here's some of my favorite blogspots for it - but they're all very specific to the stuff i listen to (mainly punk and latin american rock).
These type of sites tend to be genre-specific so if you're looking for, say, a prog rock band, maybe you'll have more luck searching for prog rock downloads websites. The older or more obscure the band, the easier it will be to find. And you'll find that a lot of these sites are not in english- you have to get comfortable visiting and downloading from sites in spanish, portuguese, russian or what have you and your life will get easier.
Don't limit yourself to blogs or music download-specific sites. Some people post album dl links on youtube. When i was in high school i downloaded The Black Parade from DeviantArt. The internet is far and wide and you can find stuff anywhere
But what if i can't find an album like this?
Alternative 1: Legally
Go find a record store and buy the album you want. You can also check the artist's bandcamp or any other website where you can buy their music and get it as a file on your pc (no streaming shit). Some albums are out there for free, legally! If you know an artist who uploads their music to tumblr you can just right click on their mp3 upload and download it directly :^)
Alternative 2: The classic
you can pretty much google youtube mp3 converter and click any link and it'll do the work. Here's a link from a safe piracy subreddit. You paste a youtube vid's link and hit convert/download etc.
I've also heard some people say Lucida is good (lets you download songs and albums by pasting the spotify/bandcamp/wtv link) but i can't say it has worked for me- always gives me a network error. But maybe it works for someone else.
Step 2: I got the music- now what?
Now you post it! Some songs (obscure or copyright-free enough) will just let you post them like that. Most songs won't. For a lot of them you'll have to add some silence or edit the metadata.
Adding silence to a song:
Option 1: Get audacity for free. Go to File > Open on the top bar and open the song you wanna add the silence to. Make sure you're at the start of the track (it says 00h00m00s at the bottom). Go to Generate > Silence... on the top bar also. Choose how long you want the silence to be, click "generate". You'll see a straight line appear at the start of the track- that means it worked. Go to File > Export > Export as MP3 to save it. You'll see a pop up where you can edit the metadata (things like artist, year, genre, etc.) i like having my audio files with metadata but for the purpose of tumblr posts you'll want to leave all that empty- if it's got that info erase it. Click "Ok". Done!
Option 2: Do it online on audiomass. Go to File > Load from Computer, open the song. Click on the white square with the S (insert silence button). Choose how long you want it to be, click "insert silence". You'll see a straight line appear at the start of the track- that means it worked. Go to File > Export/Download. Make sure it's mp3 format, i always save it as 256kbps but it's not neccessary. Click export. Done!
Some songs let you get away with only 5 or 8 seconds of silence. I try to have it be as short as possible, but most songs will need 10 seconds of silence. Sometimes even a little more, if even with the 10 seconds it doesn't let you post it try adding 0.25s more and checking.
I always play the file i just exported, to make sure everything's right.
Editing the metadata:
I'm gonna be honest i don't know how necessary this is but the audio post format works in mysterious ways so it's always better to be one step ahead. If you got it from youtube to mp3 or already added the silence then your file won't have any metadata, unless you didn't clear it when exporting from audacity. if you got it legally or pirated from any blogspot type site and didn't edit it at all it will probably have metadata. To edit it you have to right click the file > Properties, go to the "details" tab, and there you'll see things like title, author, year, genre, etc. You can just click on any section and change or erase it, then click "Ok".
As a last thing, it's generally better if the file is not saved as the song's name. Just name it anything else.
Compressing the file:
I almost forgot but there's also a size limit. I don't remember it at the moment because i've only had a problem with it once, but if you do just google "compress mp3 file" and go on any website to do it LOL
Step 3: Posting it
Now just go make a new audio post. Upload the file from your pc. If there's an error sometimes it'll tell you what it is (you don't own this song/the file is too heavy/etc) but sometimes it will just delete the audio post format and not tell you anything. If there's any error make sure you did everything (the silence, the metadata, the size, the file name). Maybe go back and add 0.5 or 1 more second of silence at the start. Sometimes tumblr just won't want you to post a song even with every step done right- nothing to do about that :( Sometimes you can try back after a while and it will let you post the song- sometimes it won't. There's no real logic to it tbh.
But if everything goes right it will upload correctly. Now you can add the song's title, artist and album info, and album art or whatever image you want n_n Hit post and done!
#im sure someone'll see this post and go damn bitch you live like this#piracy#<- not specifically but eh#im in desperate need for ska themed blinkies btw#chizitxt#music
75 notes
·
View notes
Text
I usually do not recommend apps because I hate things that look like advertisements, but I recently took a long journey down the road of "I want to backup an SMS conversation with tens of thousands of messages" and ran into so many roadblocks and pitfalls that I wanted to share the only thing that seems to have worked. I am also sort of hoping that people with more Android chops will say something like "oh you missed officially-supported option XYZ" or something like that.
1. Google will backup your SMS but unless you pay for Google One, your MMS will be lost—so all the photos etc in the thread are gone.
2. Moreover what is in Google One will not be downloadable into a format that you control. The only option is to port to a new phone.
3. Moreover even if you use Google Takeout to try to download that archive from Google One, the result is busted and doesn't include said media.
4. Many of the other apps have a "free trial" that is so hampered that you cannot actually make a single archive.
5. The app I found will export a massive XML file to one of several filesharing services—Google Drive, Dropbox, and Onedrive—as well as a local backup that can presumably be ported over USB. The app has an associated web viewer, which has problems with loading all the videos and pictures in a long text chain, presumably because it is trying to cram the entire thing into the DOM. If you unselect loading those, you can "click to load" them afterwards, and this works, although it can cause the scrolling to get lost.
6. However, the fact that it's an XML file means you can do SAX parsing of it, even though there could be 100MB videos in the "data" attribute of some of the tags (!). I've already been experimenting with doing that—written a little parser that sends everything to an SQLite3 database.
7. The format of the dump seems to be. "smses" is the root tag pair, and within it are tags of type "sms" and "mms". "mms" can contain two children, "parts" and "addrs". A "parts" tag can contain multiple "part"s which contain the "meat" including the "data" attributes, which seems to be where all my pics and videos have gone. An "addrs" tag contains "addr"s that seem to be just participating conversationalists. There's a hell of a lot of metadata stored in the attributes, not all of which I have deciphered beyond the datatype of each field.
8. I think I want to actually do the whole SQLite3 song-and-dance and just dump pictures and videos to some static folders. Then you could write a small local webserver to deliver a properly scrollable and searchable version. But right now, having a backup that I can save to a USB or several is really comforting.
15 notes
·
View notes
Text
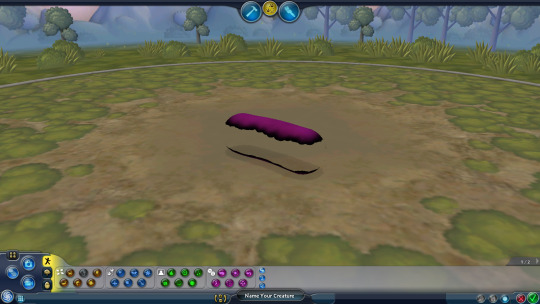
as i covered before, the TribalAccessoriesEditor launch state is supposed to load Shortfuss as the default editor mode, but references the wrong file and loads some transparent sausage instead
i made a package file where i replaced the default editor models for both creature and cell editors with a keysmash, because im pretty sure thats just going to load the sausage as a placeholder
keys editorStartupModel cell_editorModel~!asdasdasdasdasd.cll end
keys editorStartupModel creature_editorModel~!bbbobobobobobo.crt end
and i also edited the tribal accessories editor setup itself to load 0x0654E276.crt, the actual hash for Shortfuss, instead of Shortfuss.crt lmao. which didnt seem to work but whatever
EDIT: i just realised its because theres no crt file for it either! the normal creature editor bodies are all crt files which the game loads fine, but the other maxis creatures including shortfuss are stored in Spore_Content.package with bem, creaturedata, png, pollen_metadata and summary files. and none of these is a crt file! therefore the game still doesnt load anything other than the sausage
[edit continued] but you could theoretically copy the shortfuss crt file from that assembled content zip (or make a new one from the png metadata with the png xml model tab here), throw it into the game as Shortfuss.crt and that would work with no issues
anyway heres the sausage in the creature editor, so we can finally see its vertebrae! it has 8 of them, theyre clearly creature not cell vertebrae, but for some reason the vertebrae themselves appear at their thinnest width despite the thickness of the creature
it still appears transparent in the test drive. weird because the texture seems normal while its loading

if you ctrl+z, or at ANY!!! point, it nukes literally the entire creature, which apparently also makes the color of the base paint black. im pretty sure if you go into paint mode or test drive it will crash the game so i didnt

if you scale any of the vertebrae, it will reset any adjacent vertebrae to their normal width

the sausage can be edited fairly normally from here too, but it will retain the bizarre transparent paint and, again, you literally cant undo anything because your guy will just be gone forever
if you try to save it, the game will consder it not enough parts to save no matter how much you have (and like. this also isnt even a requirement for creatures normally! i only see this on building/vehicle editors! or maybe this is just not seen normally because having any part at all with the minimum 2 vertebrae is 3 parts?)

well cheat engine to the rescue again. i set the save value to 1 and softlocked the game trying to save it. so rip to this guy i guess (thankfully restarting the game afterwards is safe)

in the cell editor, if you try to edit a cell and hit new cell to generate a body, it will just reload your entire cell with random base paints because it cant load the sausage! it also resets your dna budget so this just acts as a more convoluted way to use adddna
i used cheat engine again to edit the selected editor in the main menu to the cell editor and that loaded the sausage this time! AND with cell vertebrae! still 8 of them, with the same size resetting

still way more transparent than any normal cell, even if you open the sporepedia to preview a cell and go back (which usually makes cells opaque)


hitting ctrl+z this time literally just crashed the game. not sure if it was specifically because i was in the paint mode, and undoing it didnt go to the build mode, as it did last time (where i hit ctrl+z in paint mode by accident, but the last actions were in build mode so it booted me back there)
im not sure what the transparency on the cell/creature comes from, since it just ADDS to the cell's normal transparency, so i dont think this sausage is a cell in either editor either. especially since it has different vertebrae, depending on what the editor you loaded it in was (the vertebrae have different models in the cell editor)
im not sure whats wrong with it in general. the game acts like it has no parts, even if it has several perfectly functional and modifiable vertebrae, it remains always transparent no matter the paints you selected, and the game just nukes it if you try to undo any action. how does that work??
im also not sure where its stored internally. it doesnt seem like the game has a defined xml file (which is how it stores creatures normally) thats just for a placeholder error model. but its clearly SOMEWHERE, and the fact that it loads different models for the cell and creature editor is very curious too
11 notes
·
View notes
Text
So I just did a little test that I should've done way earlier.
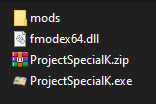
These are the only files needed to run Project Special K. The mods folder contains an Isabelle that's currently replacing Mitzi while I work on special characters.
What I did first was add a line to VFS::Init where it loads assets from that specific zip file. Then it tries the (here nonexistent) data folder, then it adds everything in the mods folder.
Technically that mods folder wouldn't be required if I didn't hardcode a need for certain characters to test with.
For a release build (they start faster) the only obvious difference is that it doesn't play the hourly music. That's in another mod. Instead it plays No one's around to help, a fallback track.
...
But now I'm thinking, the whole archive, virtual file system, mods and all that? That whole thing? Like I said before, it's modeled after the system in Starbound, and I've implemented it several times for different projects. But every time, they all had two things in common against Starbound's model: they use ordinary zip files (with or without different extensions) instead of custom uncompressed archives, and they don't use the assets and mods folders — most implementations of mine expect all those zips to go in the same folder as the game itself, and use the data folder to override it.
In Starbound, there are three places where it looks for assets:
the assets folder, where packed.pak is expected to be found along with the user folder
the mods folder
the Steam Workshop
The first two can be changed by editing sbinit.config or specifying another with the -bootconfig parameter (which also by the way specifies where to put saved game data), the Workshop is added on the fly.
And on top of that, there is no technical difference between packed.pak, the user folder, and any mods, Workshop or otherwise. All of them are archives or folders with a metadata file that identifies the asset, and gives it a load ordering priority and dependencies. That's how packed.pak is always loaded first: it has a priority of like -9999.
So I'm thinking, since Project Special K is the first time my implementation also supports priorities and dependencies between assets, should I maybe match Starbound's behavior and put the main data in an assets folder? With a pskinit.json and -bootconfig parameter?
11 notes
·
View notes
Text
How to use Nightshade to Protect Your Art
Nightshade is a program that is relatively easy to use. You can search for it using the search term "glaze nightshade."
You WILL have to download popular image models so Nightshade recognizes what your art is and is able to poison it. This is done automatically the first time you run the program.
I have done extensive research into this, and have even talked Sean Shan of University of Chicago and have been assured that YOUR data is NOT being retained. This is a case of using AI to fight against itself. At this point, it is the best option to prevent your art and photography from being scraped.
Even though this program presents no danger to end users, you should be informed of this.
After everything is downloaded, you should select an image you wish to "Shade."
Once you select your image, Nightshade will pick a tag that it believes covers what's in the image. Sometimes this tag is wrong or not useful. (For example, I loaded a drawing of Brian May into the program, and it tagged it "woman." I changed it to "man.") The tag must be one word, and should be relatively general.
Images with less detail should have less poisoning applied. For my art, I use the default setting. While this does cause noticeable artifacts, it is not so much that it distorts the image. It just looks like a compressed jpg.
You will also need to choose the render quality. I usually choose the highest setting, which is the slowest, and takes about 20 minutes. It's worth it.
Then, choose a spot to save the image. It will save as the original file name with data appended. I generally delete this appended info from the new file before I post it.
When you do post it on social media, your alt text should contain the tag you used when you created it. For example, I posted a skull and put "A hyena skull in greyscale" in the alt text. This ensures that language models will pick up the art as "skull" and this will contribute to poisoning the skull dataset.
If you are posting the image on your own website, you should make sure to add the tag to the metadata of your image.
Then you post it!
Again, if you have any art that you want to run through Nightshade, please contact me and I'll gladly do it for you. There will be a web version of nightshade eventually, which will make the process much easier. But for now, don't be afraid to rely on people whose GPUs can handle it!
34 notes
·
View notes
Text
How Noctie chooses her poses
Following a conversation in the comments with @greenplumbboblover and @kimmiessimmies, here is an overview of how I have sorted out all the TS3 poses that I've gathered in the past 12+ years. This has been super useful for me to find the exact pose that I need.
I never use the list from the Pose Player for a very good reason: I have THOUSANDS of poses. It's simply not feasible to wait for the list to load and scroll through it endlessly with its tiny thumbnails.
So instead, I use Photoshop Lightroom (🏴☠️) to neatly sort out all the poses previews. I currently have 7,471 previews. Most of them show more than one pose, so I'd say that I roughly have at least 50,000 different poses in my library. Hence the need for efficiency.
(My version of Lightroom is in French.) I have added tags to each of those pics. You can see them in the upper right corner. For example, "calling, lying, phone, sitting on sofa" for the selected pic.
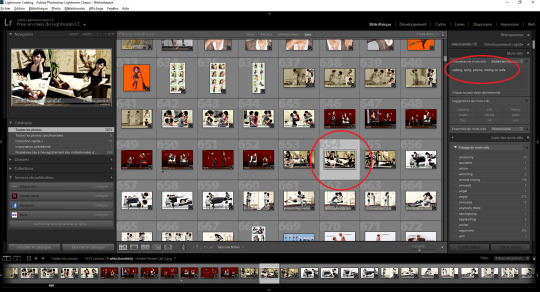
When I need a pose, I type the tag that I'm looking for in the text box above.

In this example, I typed "worried". I'll get a selection of 204 pictures, to go through, and select those that are the most appropriate for my scene.
Those that I think I could use, I put in a quick collection. I will use that collection throughout the whole scene, so the collection is a temporary mishmash of poses, depending on what I have in mind and how the characters should move. I delete everything from the collection once I'm done shooting the scene.
I often do this process of choosing the poses before launching the game (or while it's loading), so that I don't have to waste too much time once I'm in-game. When I'm actually shooting, I go through my collection to select the appropriate pose (sometimes, I even sort them out in the order in which I'm supposed to use them). When the code is written on the pic itself, I just memorize it and simply type it back in game.
Sometimes the pose name is not on the pic itself, and so I have to look it up inside the .package file. It's an additional step, but it comes with a benefit: I can just copy/paste the code from the file. So for example, I don't know the code for the pose below, it's not shown on the pic. But the picture name can be seen at the bottom ("Red Mechanics Of Emotions Melancholy").
So I quickly go to my poses folder via a shortcut in my file explorer, and look it up. That requires for the .package file and the picture to have the same name. This is something that I make sure of doing every time I download a new pose.

I open the .package file with s3pe, look for the thumbnail of the pose I need (that sometimes takes some time...). Last one in this case.

Then finally look up and copy/paste the code from the XML. (and then paste it back in game, as you'd have guessed)
I also do it that way when the pose code is overly complicated and my brain refuses to memorize it.
Voilà!
(and yes, I do that for every single pose that I use in my story)
I'm sure there are more efficient ways to do things. I'm just sharing my process in case it could help some people and also for @greenplumbboblover to understand why I don't use the Pose Player list. I chose to do that because my poor brain couldn't keep up with all the poses I had. I ended up always using the same ones, as well as wasted a lot of time going through all of them.
There is a prerequisite to my process however, and that is to take the time to properly tag ALL of my gazillions of pics. That took me months, no kidding. But it was also extremely rewarding once it was done. Now, I make sure to tag every new picture I import into Lightroom, and it only takes 2 minutes.
Another thing that I do is that I save tags, not only in Lightroom, but also in the pic metadata. (again, the example is in French, but it basically says "save metadata in the file")
That means that even if I ever use a different software, or if I have to reinstall Lightroom or whatever, the tags are saved in the file properties.
It only works for JPGs though. It doesn't work on PNGs, which is a bit of a bummer. I should take the time to convert all the PNGs to JPGs, but I haven't gotten around to do it yet.
Please note that some of the poses that I have are no longer available. I don't know which ones exactly, I've had some for over 12 years and can't even remember where I downloaded them initially. :/
Anyway, this is it! Sorry about the long post!
I hope this is useful to someone. :)
39 notes
·
View notes
Note
I think the way you made those playlist dividers is crazy smart! Although I'm wondering how you got the emoji's to work. I'm trying to make my own and it's just turning to question marks haha. Share your wisdom!
(for anyone who didn't see the previous post, anon's talking about this playlist!)
I don't know what your problem is, so I'm gonna tell you my problem and how I solved it and hope it helps you.
So when I made the dividers, this is what I did:
Loaded the mp3s into itunes on my computer, which I haven't used for its intended purpose in years, but itunes is the only program I have that lets you easily change a song's metadata (what's displayed as its title, artist, album, etc) so that's what I went with.
I changed "Song Title" to "❤️ Song Title ❤️" by "The Musician's Name" on "This Song's Album" or whatever.
I added the song to spotify on my computer. It correctly displays as "❤️ Song Title ❤️"
I'm making an assumption, anon: I'm assuming you got this far without running into trouble. I'm making this assumption because 1) if you did the same thing as me, and ran into trouble on one of the above steps, idk how to help you because I didn't have trouble there; and 2) this is the point after which I had trouble, so if you also had trouble after this point, I can help you.
I did the whole process to upload the spotify playlist with the mp3s on computer to the spotify cloud or whatever and then download the playlist with the mp3s on my phone & tablet so that my phone & tablet also can use those mp3s. I don't remember the exact steps for this, you'll have to google it and find spotify's guide, this post is about making emojis work, not about getting mp3s into spotify on your phone
I discovered that most of the mp3s loaded onto my phone/tablet had their emojis stripped out. (But not all; like 1/4 had working emojis for some reason, no idea why. My theory was maybe older emojis worked & newer ones didn't but that wasn't always true.) This meant in my playlist the song named "❤️ Song Title ❤️" on my computer was grayed out on my phone because it thought it didn't have that file, and meanwhile there was now a second song on my phone named "Song Title"* that's missing its emojis
*(disclaimer: I did this MONTHS ago so I don't remember whether the buggy mp3 names displayed as "Song Title" or "? Song Title ?" or "SongTitle" or whatever.)
I tried to find a free metadata editor that could work on phones and could handle emojis, and I failed. So don't try this step, it probably won't help.
go into wherever your phone's spotify files are stored. The Files app or the Google Drive app or whatever, idk what device ur on.
inside the spotify folder you should find a folder named "Synced files". These are the mp3s that got synced from your computer's version of spotify.
inside "Synced files" you're gonna find a folder named TheMusiciansName. Inside that folder you'll find one named ThisSongsAlbum. Inside that folder you'll find an mp3 named SongTitle.
For some reason, renaming that mp3 from "SongTitle" to "❤️ Song Title ❤️" (not even the metadata, just the name of the file) fixed how the name displayed in spotify, so now it correctly understood that this is the "❤️ Song Title ❤️" from the playlist I made on my computer and it could play instead of being grayed out. I don't know why that worked, but it did. All the other songs in the "Synced Files" folder also have NamesListedLikeThis and yet they still display correctly in spotify as long as they don't have emojis, so who knows.
If this doesn't solve your problem, anon, then I'm afraid I don't know what your problem is and I don't know how to solve it. Good luck.
18 notes
·
View notes
Text
Why Irish Businesses Should Always Maintain Their Websites
Since so much is pulled up online, your website may be the first interaction a customer has with you. Having a good-looking website can separate businesses in Limerick, Galway and even Dublin from rivals, allowing them to attract new customers.
We have assisted many Irish businesses and what we notice most is that keeping your website up to date helps maintain your online reputation and promotes growth in the future.
In the following sections, we will focus on why maintaining your website is important for your business.
1. First Impressions Matter
You would make sure the area near your store was tidy, fresh and not damaged. What is the point of doing it again in the cyber world?
Most of the time, a potential customer’s first contact with you happens when they visit your site. If the site takes a long time to open, links do not work, the information is old or the appearance is outdated, it gives a feeling that nobody cares. This scares off visitors and weakens your reputation.
If you regularly look after your website, it will continue to be fresh and serve its purpose, making people trust it and enjoy it.
2. Security Should Always Be Considered from the Beginning
More organizations are under cyber attacks and even small businesses are being targeted. Almost all the time, WordPress, Joomla, Magento and other content management systems make security updates to guard against new risks.
If you do not maintaining of your site:
Your customer details could be taken by fraudsters.
A search engine may blacklist your website.
Our maintenance services at Flo Web Design include regular security audits, updates for plugins and malware scans to give you a worry-free website and protect your visitors.
3. SEO depends on regular website maintenance
Google and other search engines prefer websites that get updated and maintained frequently. If a site is slow, features old information or isn’t accessible on mobile, it will be given a lower ranking by search engines.
Keeping your website updated makes it better:
How fast web pages are loading
Mobile responsiveness
Metadata and organized data
Dealing with broken links
Content freshness
As a result, your website becomes more visible to search engines, it gains higher positions and gets more traffic.
4. Improve the way users interact with the application
Website users today want sites that are easy to use and quick to respond. Anything that makes the site slow such as images that don’t load or ancient navigation, will lead them to leave.
Maintaining the website often helps keep:
All the links and pages are accessible.
Pictures and videos are displayed without any errors.
Checkout, buttons and forms work efficiently.
Updates are made to give the program a new look.
A seamless experience for users will make them more likely to stay and possibly become paying customers.
5. Making Sure Your Content is Up-to-Date
Information about companies can vary—such as their prices, services, working hours, contact details, special deals, employees and similar elements. If the changes aren’t reflected on your website, it confuses your customers and decreases trust.
If your site is updated, you demonstrate that your business is lively and interested in its customers.
Our team at Flo Web Design ensures that Irish companies update their content, update their blogs and remove any old materials from their website.
6. This involves backing up and recovering your data
Website crashes can happen for reasons such as plugin conflicts, issues with the server, hacking or making a mistake while deleting something important. If you don’t back up your files often, you could lose everything you have worked on for a long time.
With our maintenance package, your site is backed up automatically, making it easy and quick to restore it and continue your business.
7. The standards of both Compliance and Performance
All Irish businesses should follow the rules set out by GDPR. Failing to keep your contact forms and cookie policies current could result in serious fines and legal issues.
Maintenance done regularly will help your website:
Follows the necessary regulations for data protection.
The website is fast to load on every type of device.
Still works properly after OS and browser updates.
It’s more important to establish trust and eliminate risks than just fulfilling the requirements.
8. Making Your Website Resistant to Future Changes
Technology keeps advancing all the time. Plugins become old, browsers are updated and people’s needs change.
When you maintain your website regularly, it grows with your business. If you add new features, boost e-commerce or update the design, frequent upgrades help you not have to begin again.
How a Retailer in Ireland Benefited from Website Maintenance
A shop in Cork contacted us for help because their site was down for two days. Since the developers failed to update the site’s plugins or security measures for more than a year, the site was breached.
We recovered the site from our backup, removed the malware, updated the plugins and applied the best security measures. By opting for a monthly service package, they haven’t experienced any downtime and now get 35% more online inquiries due to faster performance.
Take action before a problem arises. Keeping your computer well-maintained is like having insurance.
So, What Services Are Part of Website Maintenance with Flo Web Design?
Our services include packages that are customized for businesses in Ireland.
Keeping an eye on security
Ensuring a fast website
Links on your website are checked for breaks
Backup & recovery
Updates on GDPR compliance
Updates to the content (upon request)
We’ll take care of your website’s back end, helping it run as efficiently as you run your business.
Conclusion
Just as you maintain a car regularly, you should keep your website up to date. This rule also applies to the internet. A secure, effective and successful website depends on regular upkeep.
Your website’s updates, security and page issues are all taken care of by Flo Web Design. We handle all the necessary jobs, allowing you to focus on your business.
Want to Maintain Your Site in the Best Way Possible?
We will make sure your website is kept safe, fast and performing at its peak each and every month.
2 notes
·
View notes
Text
Mp3tag
A very-basic crash course in adding covers and metadata to MP3 files
Step 1: Have Mp3tag installed and open on your computer
Step 2: Go to File -> Change Directory
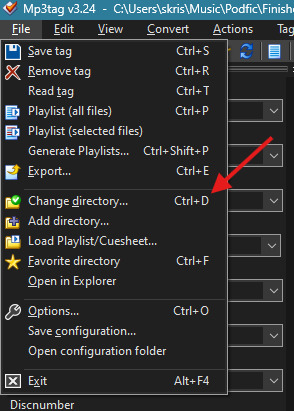
Step 3: Navigate to the file where your MP3s are located and click Select Folder (don't go into the folder - Mp3tag loads the contents of the whole folder for editing, so you need to select the folder itself, not the MP3s inside the folder)
Step 4: Select the file(s) that you want to edit from the list on the right

Step 5: Enter any metadata that you want to apply to those files in the fields on the left (if you're selecting multiple files, don't edit any fields that you don't want applied to ALL the selected files)

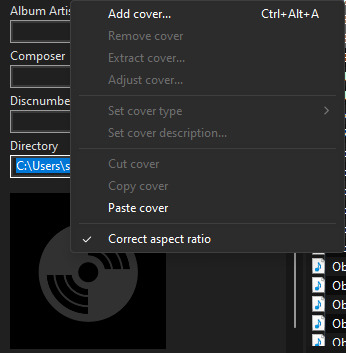
Step 6: Add a cover by right-clicking the album icon at the bottom left and selecting Add cover
Step 7: Navigate to the file where your cover image is located, select the image, and click Open
Step 8: Click the save icon in the upper left corner

Rinse and repeat for any and all MP3s you have hiding in the corners of your computer! And if you want to know what any of these other buttons do... don't ask me, because I don't know ���

8 notes
·
View notes
Text
Setting a GNOME extension to run at the greeter
I recently installed Linux on my old Surface Book, a touchscreen device. I want to be able to use the entire interface with the keyboard unplugged. This means I must use the onscreen keyboard frequently - but the default GNOME OSK (onscreen keyboard) is doo doo trash, and I don't want it. You will need root access for this tutorial.
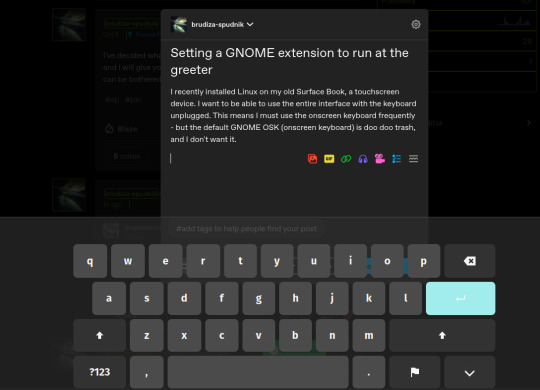
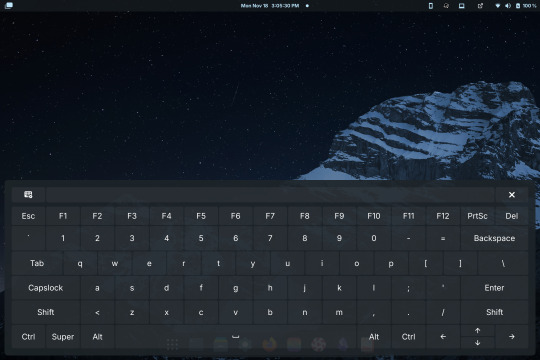
Compare the default GNOME OSK (left) to the new and improved one (right).
This tutorial involves copying a standard GNOME extension into a folder that's readable by any user, then enabling it for use by the GDM user, which governs GNOME's greeter (login screen).
The extension I will be installing using this method is the above keyboard, [email protected] (which can be found via GNOME's extension manager). This is done with the purpose of accessing this significantly improved onscreen keyboard even at the login screen - without this tutorial, the extension does not load until after you have logged in. This method can be done with any extension, although I'm told the GDM user is more restricted than the actual user so some things may not work.
Step 1: Set up the extension in userspace.
Modifying the extension config after it's copied over will be a pain in the ass. Get all your configs ready using the extension's own menus or config files. No rush, as you can still do this bit up until step 5.
Step 2: Move the extension from user-install to system-install.
In order for the GDM user to access the extension it must be in the system-installed folder. For my OS (Zorin) it will be in good company.
sudo mv -r ~/.local/share/gnome-shell/extensions/[email protected] /usr/share/gnome-shell/extensions/
You can also copy it instead of moving it, but you have to rename the user-install folder (in ~/.local) to break it. Otherwise the system would rather use the user-installed one, and will ignore the system-installed one on boot. I think.
Make sure that the gdm user can actually access the files as well:
sudo chmod -R a+rX /usr/share/gnome-shell/extensions/[email protected]
Step 3: Modify the extension metadata file to let it run on the login screen.
sudo nano /usr/share/gnome-shell/extensions/[email protected]/metadata.json
look for the line that says
"session-modes": ["user"],
If the line doesn't exist, just add it. You need it to say
"session-modes": ["user", "gdm", "unlock-dialog"],
Step 4: Enable the extension for the gdm user.
To do this and the following step, you must be able to log in as the gdm user. There are multiple ways to do this, but the way I used is via `machinectl`. If you try to run this command on its own it should tell you what package you need to install to actually use it. I do not know the ramifications of installing this, nor do I know its compatibility; all I can say is it worked for me. If you are uncertain you will have to carve your own path here.
Once it is installed, log into the gdm user from a terminal:
machinectl shell gdm@ /bin/bash
and enter your sudo password.
At this point I recommend checking the current list of enabled extensions:
gsettings get org.gnome.shell enabled-extensions
On my computer, this came back saying "@as []", which means it's blank. To enable your desired extension:
gsettings set org.gnome.shell enabled-extensions "['[email protected]', 'if the above command did NOT come back blank just put the rest in here.']"
Step 5: Transfer the settings from the userspace install to the system install.
Right now, the extension should be working on the login screen. To make sure, press ctrl + alt + delete to log out, or restart your computer. You will notice that while the extension is functioning, none of your settings saved. To fix this you must use dconf to dump and then reimport the settings. Get back to a regular user terminal and run:
dconf dump /org/gnome/shell/extensions/[email protected]/ > extension.ini
Now you have your settings in a nice neat file. The gdm user can't access this though since it's in your user folder. My quick and dirty solution:
sudo mv ~/extension.ini /extension.ini sudo chmod 777 /extension.ini
If you want it in a better place than the system root folder you can put it there. I don't really care.
Now you log into the GDM user and import the settings file there.
machinectl shell gdm@ /bin/bash dconf load /org/gnome/shell/extensions/[email protected]/ < /extension.ini
Now log out of the gdm user and clean up after yourself.
sudo rm /extension.ini
Now restart or log out and you will see that your extension is now functioning with all its settings.
Huge thank you to Pratap on the GNOME Discourse site. This post is basically just a tutorialized adaptation of the thread I followed to do this.
3 notes
·
View notes
Text
Best Practices for Data Lifecycle Management to Enhance Security
Securing all communication and data transfer channels in your business requires thorough planning, skilled cybersecurity professionals, and long-term risk mitigation strategies. Implementing global data safety standards is crucial for protecting clients’ sensitive information. This post outlines the best practices for data lifecycle management to enhance security and ensure smooth operations.
Understanding Data Lifecycle Management
Data Lifecycle Management (DLM) involves the complete process from data source identification to deletion, including streaming, storage, cleansing, sorting, transforming, loading, analytics, visualization, and security. Regular backups, cloud platforms, and process automation are vital to prevent data loss and database inconsistencies.
While some small and medium-sized businesses may host their data on-site, this approach can expose their business intelligence (BI) assets to physical damages, fire hazards, or theft. Therefore, companies looking for scalability and virtualized computing often turn to data governance consulting services to avoid these risks.
Defining Data Governance
Data governance within DLM involves technologies related to employee identification, user rights management, cybersecurity measures, and robust accountability standards. Effective data governance can combat corporate espionage attempts and streamline database modifications and intel sharing.
Examples of data governance include encryption and biometric authorization interfaces. End-to-end encryption makes unauthorized eavesdropping more difficult, while biometric scans such as retina or thumb impressions enhance security. Firewalls also play a critical role in distinguishing legitimate traffic from malicious visitors.
Best Practices in Data Lifecycle Management Security
Two-Factor Authentication (2FA) Cybercriminals frequently target user entry points, database updates, and data transmission channels. Relying solely on passwords leaves your organization vulnerable. Multiple authorization mechanisms, such as 2FA, significantly reduce these risks. 2FA often requires a one-time password (OTP) for any significant changes, adding an extra layer of security. Various 2FA options can confuse unauthorized individuals, enhancing your organization’s resilience against security threats.
Version Control, Changelog, and File History Version control and changelogs are crucial practices adopted by experienced data lifecycle managers. Changelogs list all significant edits and removals in project documentation, while version control groups these changes, marking milestones in a continuous improvement strategy. These tools help detect conflicts and resolve issues quickly, ensuring data integrity. File history, a faster alternative to full-disk cloning, duplicates files and metadata in separate regions to mitigate localized data corruption risks.
Encryption, Virtual Private Networks (VPNs), and Antimalware VPNs protect employees, IT resources, and business communications from online trackers. They enable secure access to core databases and applications, maintaining privacy even on public WiFi networks. Encrypting communication channels and following safety guidelines such as periodic malware scans are essential for cybersecurity. Encouraging stakeholders to use these measures ensures robust protection.
Security Challenges in Data Lifecycle Management
Employee Education Educating employees about the latest cybersecurity implementations is essential for effective DLM. Regular training programs ensure that new hires and experienced executives understand and adopt best practices.
Voluntary Compliance Balancing convenience and security is a common challenge. While employees may complete security training, consistent daily adoption of guidelines is uncertain. Poorly implemented governance systems can frustrate employees, leading to resistance.
Productivity Loss Comprehensive antimalware scans, software upgrades, hardware repairs, and backups can impact productivity. Although cybersecurity is essential, it requires significant computing and human resources. Delays in critical operations may occur if security measures encounter problems.
Talent and Technology Costs Recruiting and developing an in-house cybersecurity team is challenging and expensive. Cutting-edge data protection technologies also come at a high cost. Businesses must optimize costs, possibly through outsourcing DLM tasks or reducing the scope of business intelligence. Efficient compression algorithms and hybrid cloud solutions can help manage storage costs.
Conclusion
The Ponemon Institute found that 67% of organizations are concerned about insider threats. Similar concerns are prevalent worldwide. IBM estimates that the average cost of data breaches will reach 4.2 million USD in 2023. The risks of data loss, unauthorized access, and insecure PII processing are rising. Stakeholders demand compliance with data protection norms and will penalize failures in governance.
Implementing best practices in data lifecycle management, such as end-to-end encryption, version control systems, 2FA, VPNs, antimalware tools, and employee education, can significantly enhance security. Data protection officers and DLM managers can learn from expert guidance, cybersecurity journals, and industry peers’ insights to navigate complex challenges. Adhering to privacy and governance directives offers legal, financial, social, and strategic advantages, boosting long-term resilience against the evolving threats of the information age. Utilizing data governance consulting services can further ensure your company is protected against these threats.
3 notes
·
View notes
Text
decided to fully redo my offline music library because last time i did a massive download of my main playlist there was a transcoding step that had a mild impact to quality. for online listening i use a yt music frontend so i can just use yt-dlp to handle the download (skipping transcoding this time) turns out i needed a transcoding step because my DAP doesn't support the opus codec. it supports vorbis, among a bunch of others but initially they were in an ogg container so i had no idea. this is the part where i lose my mind. obviously i'll just use ffmpeg, just a quick for i in *.opus, -c:a vorbis, etc and. wait a minute. how much quality is that gonna lose me. so i go looking for some test results to see what codec i should encode to in the rare case i have to do lossy to lossy audio transcoding. cool aac is probably a safe but so just -c:a aac and wait a minute which one though. so i check the ffmpeg encoding wiki for aac and settle on fraunhofer libfdk_aac. and its not in my build. its not in most builds. there are no build scripts for it. i load up docker in WSL and try to pull an ffmpeg builder container thats supposed to handle non-free builds. the container doesn't exist. eventually i stumble across a github repo that hosts builds through github actions and the resulting binaries are... i think not legal to distribute but i don't really care. i can finally start transcoding it takes some time. but even once its done only ~1200 of ~1700 files have actually been transcoded but i don't even notice that yet because while those were transcoding i was scraping archive.org for .wav and .flac files of some of my most often listened to albums. they take a long time to download but thats fine i have duplicates now though. thats ok thats... manageable. well i can't just compare by filename because a lot of the new ones are prefixed with a track number and other nonsense, whereas the old ones don't have a track title in metadata so i can't use that either. i download a new program that compares them by content. it doesn't take long actually. impressive. i weed out duplicates and finally tell the DAP to update the library. it reports ~1200 tracks. i reconnect it to my desktop. that number is correct. thats how many files there are. fuck. i'm transcoding from the original ~1700 files again now. i suspect there's something my command line shell doesn't like about special characters in about 500 of the filenames. if that is the case i will have to do something to purge special characters from all the filenames and transcode for a third time i have so far been at this since before sunset. it is midnight. further bulletins as events warrant
6 notes
·
View notes
Text
How to (Probably) Save Those Fanfictions You LOVED That Were Deleted
I know I'm not the only one who has experienced this, so I wanted to explain how I was able to recover a fanfiction from a deleted account.
Obviously there is no guarantee 100% that this will work, but I'm fairly confident you'll find most old fanfictions. With the caveat here that you know some concrete detail about that fanfic (i.e. you need to know who the author was or what the title was, ideally the fanfic's ID # or upload/update date). You can search without it, but it's going to take quite a long time.
So, oh no! The Fanfiction that you read 5 years ago that you LOVED is no longer on FF.net/AO3/Etc. What are you going to do (besides weep hysterically)?
Go here: https://www.reddit.com/r/DataHoarder/comments/b6ut3j/fanfic_just_all_of_it/ (Reddit user nerdguy1138 deserves ALL the kudos and coffee and praise for this, because this would literally NOT be possible without their efforts (yes, ongoing)).
On that link you'll find multiple archives for various popular fanfiction sites over the years. Importantly, there are MULTIPLE FF.NET ones. If I remember correctly the 2nd link (updateablefanfic) is the more recent of the two. The one below that is old and is everything up to 2016. The second link is after 2016 and is ongoing. The key information here you need to know: 1. where was the fanfic you're looking for originally posted? 2. When was it created/last updated? The fanfic I wanted was finished at the end of 2017 and so I went with the updateablefanfic link.
Once you know which archive to go to, you're going to have to search for your file. You could do it the old-fashioned way and open up the preview and search with CTRL+F. But I'm going to tell you from experience that it sucks, takes forever, and can 100% be inaccurate (not because the data is inaccurate, but because there is SO MUCH data there that your browser is trying to load that it simply cannot handle it all, and if it can't load it, you can't search it). So. Instead, what you're going to do is look for the appropriate file for your fandom/work. You may not know it. Sometimes the data is sorted by Fandom letter (i.e. Pride and Prejudice is under the "P" file), other times it's sorted by username of the author(s) or the actual fic ID or name. If you know some or all of that, it will help immensely. If you know what you're looking for you can find the appropriate file pretty easily. For example the one I was looking for was in the "P" file. So I just had to look there. If you don't know any of the specifics you're going to want to repeat the below couple of steps for each file until you're able to find what you're after.
DON'T just download the giant zipped file for that letter. Let's do the simpler thing and search first. You'll also have to do this step if you don't know the ID/Name/Author, and it's a good thing to know how to do anyway. Go find the files ending with SQLITE/SQLITE3 under the ALL FILES section on the right. Download the file(s).
Paste https://sqliteviewer.app/#/metadata122.sqlite/table/metadata/ into another browser window. Click the "Open File" button on the top left and add in the file(s) you are trying to search through that you just downloaded. Give it a second to load and you'll be able to search the file for the author name/ID/Title/Fandom/Update Date, etc. etc. If the file exists in that list then it exists in the corresponding Zip file. If it doesn't, try another file. (I'm not sure if you can load multiple of the SQLITE files at once, but I kinda doubt it).
Okay, once you have located the name of the ZIP File you need - DON'T just click download. Trust me, your computer WILL hate you for it. Mine did. A lot. Instead, look and see what program was used to Zip the files. Most of the time it'll probably be 7zip. Now, go to: https://www.7-zip.org/ (or other appropriate zipping tool and download). You're going to use the program that was used to zip the file to unzip the file. It WILL go a LOT faster and your computer will hate you a (smidge) less. These files are still MASSIVE and WILL eat your memory like crazy. (I actually used a good chunk of my external 1 TB hard drive to get some extra memory for the duration of the download - I did the first option on this page: https://www.partitionwizard.com/partitionmanager/use-usb-as-ram.html page - you should also consider clearing your cache, but at these sizes I'm not sure how truly effective that will be). Anyway, download the 7zip/etc program and install. Now go and download the zip file. Once the zipped file is downloaded to your computer, right click, More options - 7zip and THEN click "Open Archive" Do NOT extract everything. You will literally be extracting hundreds of thousands of files, and while you may want more than one of them, I can guarantee you you probably don't want ALL of them. So, open archive. Search for the specific file(s) you're looking to get and extract JUST those by highlighting and clicking EXTRACT.
Okay, now the files you want will be downloaded to your desktop. But you'll notice that they are .txt only files. No more rich text. I can walk everyone through a tutorial of how I reformatted the files I pulled, but I don't want to do that on this post. I'll create a follow up on that, but with the plain .txt version you can paste it into word/google doc/notepad, whatever floats your boat and you can READ it.
An important lesson for us all: if you loved it - SAVE IT.
Hope this helps anyone who may be/has been in a similar situation to what I was in.
1 note
·
View note
Text
Yesterday, I
figured out how to force Emacs to update its metadata of whether a file differs between its memory and the file system*;
used that to get my partial save in Emacs on par with native save - the UI now correctly updates to show if the file has unsaved changes after each run of partial save, there's no more spurious blocking prompts in some cases warning that the file has changed on disk, and third-party packages "just work" (undo-tree recognizes which node in the history matches the saved file correctly, for example); and
implemented partial revert to complement partial save: same "git add --patch" UI, but instead of picking unsaved changes to be saved, I pick differences from the file to load into my in-editor copy - that might be throwing away unsaved changes, or pulling out-of-band changes to the file into my editor (like when a "git pull" changes a file I have open), but it lets me do it safely, without losing other unsaved changes that I want to keep. This was trickier because instead of having "gp" apply the changes to the file itself, we have to apply the changes to a temp file, then change the buffer to match the contents of that temp file. Luckily, Emacs' built-in "revert-buffer" does most of this, in a way that we can almost cleanly reuse - we just have to temporarily associate the buffer to the temp file, do the revert, then associate it back to the real file, and fix up another related buffer-local variable that revert messes up.
* you might think "but Emacs already knows if the buffer differs from the file", but if you look closely, it actually usually doesn't. Normally, Emacs only knows if the buffer is different from the last read or write of the file. Emacs only checks if the file and buffer differ in a few very specific situations, and even then it optimizes by only checking for content differences if the file's modified time is newer than what Emacs remembers it to be. And it doesn't provide any API for this.
2 notes
·
View notes
Text
What Is ComfyUI and What Does It Do?

I mentioned ComfyUI once or twice in the context of the AI-generated images I posted. For those who haven't looked it up yet - it's a StableDiffusion power tool: it's fairly complicated, but immensely powerful and can create several things the usual AI image generators can't. It also has plugins that allow for even crazier stuff.
So, first things first, you can download ComfyUI from GitHub. It comes up with all necessary file dependencies and opens the GUI in your browser, much like the popular Automatic1111 frontend. Right off the bat, it does all the Automatic1111 stuff like using textual inversions/embeddings and LORAs, inpainting, stitching the keywords, seeds and settings into PNG metadata allowing you to load the generated image and retrieve the entire workflow, and then it does more Fun Stuff™. For example, you can rig it as a simple GAN-based upscaler with no AI generated prompt whatsoever. Plug any upscaler model from The Upscale Wiki, and you can blow 800x600 images from fifteen years ago up to four times the size with no noticeable quality loss - insanely handy if you want to use ancient stock photos from DA for a project today. Sure, the thing can't handle smaller images as well as commercial software like Topaz Gigapixel AI does, but it works with typical StableDiffusion output just fine. Other things you can do? Area composition, for example. What's that? Run a prompt for a landscape, halt it a quarter way in, run a smaller prompt for a character, halt it a quarter way in, combine the two images by pointing where you want the character placed and run a prompt containing both from where you stopped. Or ControlNets: do you want to recreate a pose from a photo or a movie poster without all the other things the AI might infer from an Image2Image prompt? Draw a quick scribble so the AI knows how to draw a firearm and where, for example? Render a proper hand with the gesture you want? It's possible.
And then, there are plugins. I mostly use two sets of custom nodes:
WAS Node Suite for basically everything: cropping, upscaling, text-related shenanigans like string concatenation, converting string to prompt conditioning (so I can plug a line of additional detail requests into a prompt for the high-res fix, like face swapping) or adding a date and time to the output filename,
Fannovel16's ControlNet Preprocessors for generating ControlNet data from input images and plugging them into a new prompt in one go.
The WAS Node Suite can do more than that: for example, it has Semantic Segmentation-based mask tools that I could use for description-based automatic masking once I figure out how to use it. The ControlNet preprocessors? I used them to help with inpainting on both "The Operator 2.1" and "Tiny Dancer".


For some reason, using the Protogen Infinity model for inpainting yielded weird results - for example, it consistently added only a small nub to the plate on Operator 2's sleeve that was left as an attachment point for an entire robot arm, forcing me to switch to image2image generation and re-render her as a full cyborg (with hilarious results like massive spotlights on the chest). So I used the preprocessor to read the pose from the base image for Operator 2.1 and feed it into the prompt along with an inpainting mask. With the additional data, Protogen Infinity properly drew a CyborgDiffusion-style left arm, along with that plate on the top and some skin matching the base image.
I described the process of creating "Tiny Dancer" in a separate post - in short, it took inpainting, then inpainting on top of that inpainting, then cleaning everything up in Photoshop.


Another neat trick you can do with ComfyUI is the high-res fix: instead of rendering the latent image into a human-readable form, you can upscale it and feed it as an input image for another render. This has two distinct advantages over simple upscaling, as you can see comparing "The Boss of the Reformatory" (left), which was rendered in a single pass at 512x768, then upscaled with ESRGAN to 4x size, and "Princess of Darkness" (right) that was rendered in 512x768, then had latent data upscaled to 2x, fed into a shorter, 20-pass render at double size and 50% balance between text prompt and input image (go below that and pixels will start showing, go above and it'll go off-model), and then upscaled to 2x the new size using BSRGAN. Not only the image is sharper, but a re-render at doubled size redraws all the details: just look at the tattoos. The left image has them blurry and blocky, while the right one looks like straight out of a tattoo artist's Instagram. The reason is two-fold: not only I haven't unlearned things from using LAION's default dataset, which was dogshit a few months ago and keeps degrading due to how they're building it (basically, they're hoovering up every image off the internet and oversaturation of AI-generated images with background diffusion-based noise fucks up attempts at making something out of them). I still haven't perfected the process - sometimes upscaling sends the anatomy or the linework off the rails or screws up with textures and details, but the WAS Node Suite has a new tool called Sampler Cycle which somehow performs a less-invasive high-res fix with additional detail injection. It has no manual or even a description of how it works, though, so I have no clue what the parameters do and how to tweak them.
Another cool thing added in one of the recent updates is the optional real-time preview of how your image is created. Sure, it's a resource hog that can double the rendering time, but having that kind of oven window letting you see when the image is done (and when it starts overcooking) can help you optimize the rendering process. Why go with 80 passes when the image looks good after 30? Remember, it's your own computing time. You can also assess whether the model is worth using - if it takes too many steps to be serviceable, just dump it and find another one.
Best of all, though, it's free. What had me swear off online-based generators was that not only most of them offer only base SD1.5 and SD2.1 models, but also have you pay for generating the images - which, combined, make the entire enterprise look like a scam aimed at bilking suckers who have no idea what they're doing. Not just the base models are shit and can't generate anything half-decent even after 50 attempts at fairly high pass count and guidance, but there are also no tooltips, hints, references or anything of the sort at hand to help you. If you want to educate yourself about what's what, you need to go somewhere else entirely. Yeah, I get it, the computing power needed to run those things is immense and bills don't pay themselves, but getting completely basic basics for ten bucks a month kinda stinks. Meanwhile, I fire this thing up on my four-year-old gaming rig (i7 8700K and RTX 2070 Super) and not only I get results faster, I can also achieve much better effect by plugging in additional datasets and models unavailable for website-based generators.
#ai art generation#ai image generation#ai image#ai generated images#Mike's Musings#stable diffusion#ComfyUI
2 notes
·
View notes